During coursework for my Master’s in Educational Technology (@MAET) at Michigan State University last summer I made something that I am really proud of: I illuminated a tutu with a LilyPad Arduino using only online resources. I was challenged to set aside traditional learning resources, including books and the many talented makers I know. I wrote about that in an earlier post.
WHY I RETURNED TO THIS PROJECT
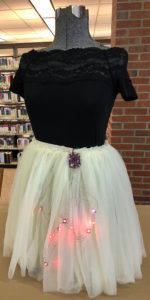
The last time I worked on this project, I had illuminated a tutu using an Arduino LilyPad and four Sewable NeoPixels. Having exhausted my time to finish the project, I strung those LEDs together using insulated wire and electrical tape, knowing that I would like to return to it sometime and finish it in a more elegant fashion.
I was prompted to continue my project when a2geeks shared a request for makers for their Ann Arbor Creativity & Making Expo 2018 (AACME – formerly Ann Arbor Mini Maker Faire). I appreciate the collaborative and social nature of the maker community. In the past I’ve been a part of it as an observer; I was excited to be part of it as an exhibitor. I especially wanted to share my process of going from beginner-to-maker with other hopeful Arduino users.
my CONTINUING PROGRESs
Once my application to exhibit was accepted, I spent each night trying and experimenting with different materials and techniques. Sometimes my efforts were successful, some were smoking failures – literally.
I began by using conductive thread to sew my original four NeoPixels to the inside of the tutu, along with eight more that I acquired from Adafruit Industries. Each step along the way, I used alligator clips to ensure that the connection to the LilyPad was still working.
After I had sewn all 12 NeoPixels, I attempted to add my LilyPad using conductive thread, also. It did not work. In retrospect, I think I had cross-wired some connections between the first NeoPixel and my LilyPad. To correct it, I removed all the thread from the LilyPad to that first NeoPixel.
What happened next was a mistake, but one that I learned a lot from. I learned to solder to connect the LilyPad to that first NeoPixel. Although the connections worked (a small triumph for my first soldering attempt), I found that the wired connection with the fabric started to smoke. Since I did not want to start a fire with my project, I unsoldered the connection, gave it some more thought, and again attempted to connect the LilyPad to the NeoPixels to the LilyPad using conductive thread (the safer and recommended choice).
At that point, I removed the first NeoPixel from the connection, since it was soldered and I wasn’t sure if it was safe. I also turned the entire skirt inside out to allow the NeoPixels and thread to be on full display.
What I display at AACME is a battle-scarred tutu with cuts and burns and melted threads that truly belies the hard-won learning I did. I love it!
My next step will be to add an input device, such as a color sensor, temperature sensor, or motion sensor.
Resources That I Used For WORKING WITH LILYPAD AND NEOPIXELS
- Arduino Product Forum
- Conductive Thread – 10 Tips by Adafruit Industries
- CRAFT Video: LilyPad Arduino 101 by Make:
- CRAFT Video: LilyPad Arduino Bike Patch by Make:
- LilyPad Arduino Tutorial by Geek Gurl Diaries
- LilyPad Pixel Board Hookup Guide
- NeoPixel Library
- Sewable NeoPixels by Adafruit Industries
- Sew Electric by Leah Buechley & Kanjun Qiu
- Tips for Sewing and NeoPixels by Rob Morrill
Related Posts
This is the fourth of four posts about learning to code and use the Arduino LilyPad. You can read about my decision to make this project in my first post. You can read an update about my early progress in my second post. You can read about how I concluded my summer work last year in my third post.
Images
All images and videos in this blog post were created by Sarah Van Loo.