Category: MAET

Arduino: An Update of My Maker Project

During coursework for my Master’s in Educational Technology (@MAET) at Michigan State University last summer I made something that I am really proud of: I illuminated a tutu with a LilyPad Arduino using only online resources. I was challenged to set aside traditional learning resources, including books and the many talented makers I know. I wrote about that in an earlier post.

WHY I RETURNED TO THIS PROJECT

The last time I worked on this project, I had illuminated a tutu using an Arduino LilyPad and four Sewable NeoPixels. Having exhausted my time to finish the project, I strung those LEDs together using insulated wire and electrical tape, knowing that I would like to return to it sometime and finish it in a more elegant fashion.

I was prompted to continue my project when a2geeks shared a request for makers for their Ann Arbor Creativity & Making Expo 2018 (AACME – formerly Ann Arbor Mini Maker Faire). I appreciate the collaborative and social nature of the maker community. In the past I’ve been a part of it as an observer; I was excited to be part of it as an exhibitor. I especially wanted to share my process of going from beginner-to-maker with other hopeful Arduino users.

my CONTINUING PROGRESs

Once my application to exhibit was accepted, I spent each night trying and experimenting with different materials and techniques. Sometimes my efforts were successful, some were smoking failures – literally.

I began by using conductive thread to sew my original four NeoPixels to the inside of the tutu, along with eight more that I acquired from Adafruit Industries. Each step along the way, I used alligator clips to ensure that the connection to the LilyPad was still working.

After I had sewn all 12 NeoPixels, I attempted to add my LilyPad using conductive thread, also. It did not work. In retrospect, I think I had cross-wired some connections between the first NeoPixel and my LilyPad. To correct it, I removed all the thread from the LilyPad to that first NeoPixel.

What happened next was a mistake, but one that I learned a lot from. I learned to solder to connect the LilyPad to that first NeoPixel. Although the connections worked (a small triumph for my first soldering attempt), I found that the wired connection with the fabric started to smoke. Since I did not want to start a fire with my project, I unsoldered the connection, gave it some more thought, and again attempted to connect the LilyPad to the NeoPixels to the LilyPad using conductive thread (the safer and recommended choice).

At that point, I removed the first NeoPixel from the connection, since it was soldered and I wasn’t sure if it was safe. I also turned the entire skirt inside out to allow the NeoPixels and thread to be on full display.

What I display at AACME is a battle-scarred tutu with cuts and burns and melted threads that truly belies the hard-won learning I did. I love it!

My next step will be to add an input device, such as a color sensor, temperature sensor, or motion sensor.

Resources That I Used For WORKING WITH LILYPAD AND NEOPIXELS
Related Posts

This is the fourth of four posts about learning to code and use the Arduino LilyPad. You can read about my decision to make this project in my first post. You can read an update about my early progress in my second post. You can read about how I concluded my summer work last year in my third post.

Images

All images and videos in this blog post were created by Sarah Van Loo.

Assessment: Feedback, Digital Tools, and Choice

When I initially approached this final assignment for my assessment class, I thought, “No problem. I’ve learned so much! This should be easy.” The reality, however, was that it took days for me to sort out what I wanted to focus on from the many important concepts I learned throughout this class. Ultimately, I settled on three takeaways from the seven modules.

The Feedback Loop is Critical in Assessment (Modules 1, 2, 3 and 7)

One of the biggest takeaways from this class for me is the critical importance of the feedback loop in assessment. Explicitly addressed in every module of CEP813, feedback should be timely and it should be direct and specific.

Feedback can help students gain more understanding and give them “more self-regulation over the learning process” (Hattie & Timperley, 2007, p. 90). When teachers help students answer three questions: “Where am I going?” “How am I going?” and “Where to next?” (p. 90) they can help students to close the gap between where they are and what they are trying to achieve.

Feedback, which can be provided during formative assessment, should be given early enough that students can act on it. It reveals students’ progress toward a learning goal, their thought processes, and possible misconceptions (Trumbull & Lash, 2013, p. 2).

Feedback should focus on… the individual student.

Feedback to students should focus only on the work of the individual student and should not involve comparisons with the work of other students (Black and Wiliam, 1998). These kinds of comparisons can be damaging to students’ self-esteem and turn the focus of the class toward competition, rather than collaboration and an emphasis on improving learning.

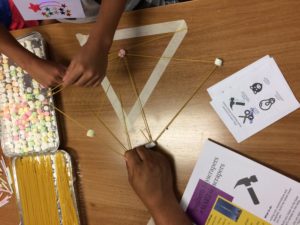
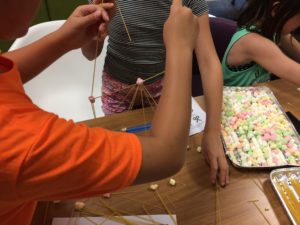
When students are able to use the feedback loop to revise and improve their work, they can demonstrate evidence of mastery learning (Wormeli, 2010). Module 7 of this course is the perfect illustration of this, as two of the assignments involved multiple iterations and feedback between students and teachers to complete.

Evidence of Understanding

Within my Rubric 4.0 are two criteria in which I specifically referenced the importance of quality feedback, Criterion 1, “Feedback to students is timely to allow students to act upon it” and Criterion 2, “Feedback to students is direct 
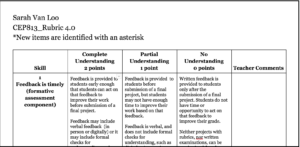
and specific.” Not only have I used Rubric 4.0 to critically review my own assessments but I have also used this to develop better assessments within the context of this course and in my teaching practice. The feedback loop was an important part of Rubric 4.0, as it was developed over time through feedback between my instructors and me.

I also addressed the feedback loop when I created Formative Assessment Design 3.0, in which I carefully detailed how I would collect formative assessment information from students to inform instruction and how I will provide feedback to students to help them close that gap between where they are and where they are going.

Digital Tools Can Enhance and Support Assessment (Modules 4 and 5)

According to Quellmalz (2013), it takes time, content knowledge, and assessment expertise for teachers to plan for assessments during instruction and to provide feedback and differentiated follow-up to students. Digital tools can provide support in all these areas.

Utilizing digital tools can make learning more accessible for all learners by allowing teachers to implement Universal Design for Learning. Educators can represent information through multiple means by utilizing digital tools such as audio files, videos, and images to support text. This can help ensure that all students are able to access assessments (Meyer, Rose, & Gordon, 2014). As Sams and Bergmann (2013) point out, the addition of digital tools to the traditional problem sets, textbooks, and other activities means all students have the option to use “the resources that best suit them to master learning objectives” (p. 19).

Course Management Systems are another digital tool that helps to support classroom instruction. From communication to instruction and assessment, CMSs can be implemented in a variety of online learning classroom models and can also support UDL. Information that teachers can glean from CMSs includes demographic data, usage data, and achievement data (CAST, n.d.). This information can allow teachers to customize instruction to meet students’ needs.

CMS Assessment 2.0

Evidence of Understanding

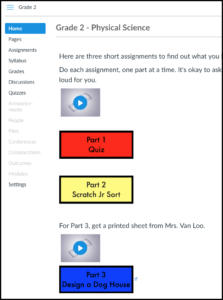
When I created an assessment to be administered through a Course Management System, CMS Assessment 2.0, I implemented UDL’s recommendation to use multiple means of action and expression by providing voiceovers for text to support struggling readers. In CMS Assessment 2.0, I carefully selected Canvas from the many available CMSs because of its robustness, flexibility, and ease of use for young students.

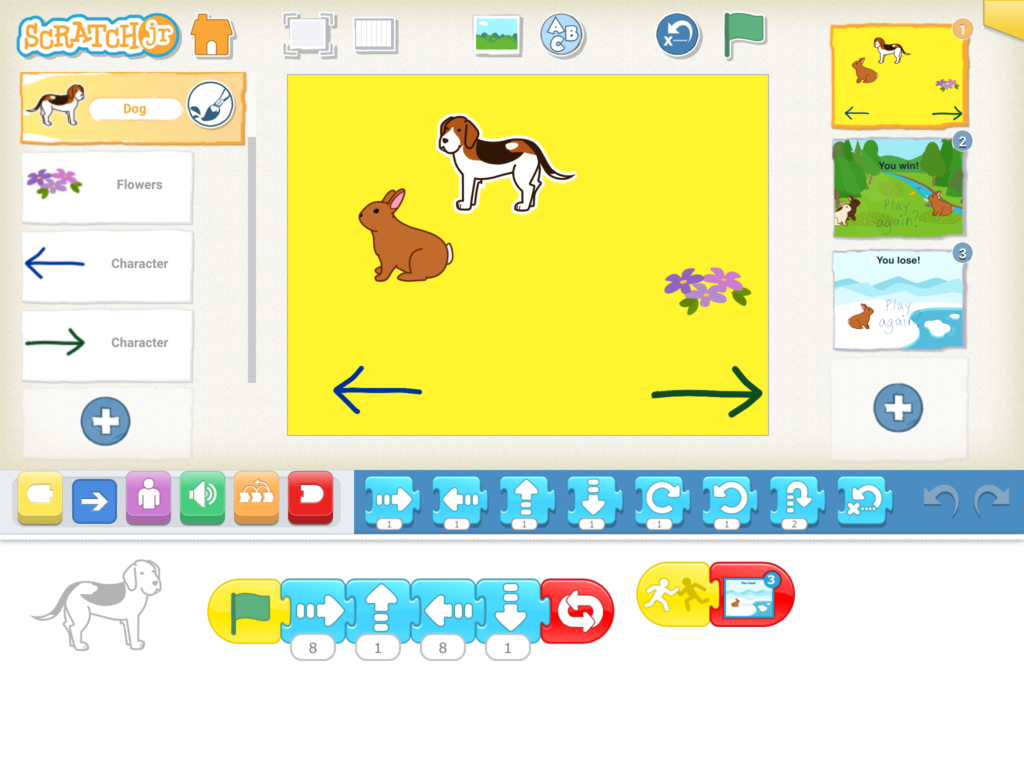
Digital Games are Engaging, Motivating, and Allow for More Choice (Module 6)

Another way to support UDL is by allowing multiple means of action and 
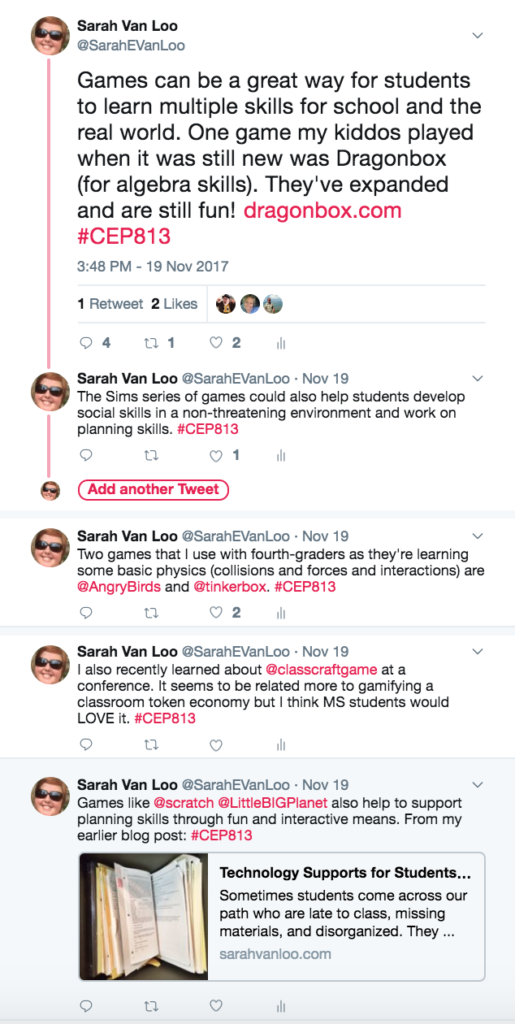
expression, whereby teachers allow students to demonstrate their understanding of course concepts in whatever way best suits them (Meyer, Rose, & Gordon, 2014).

Games and coding apps like Minecraft, The Sims, Little Big Planet and Scratch help support and develop planning skills, are fun and engaging, and give students another choice for demonstrating their learning. And as Black and Wiliam (1998) note, choice is beneficial for all students, not just students who need accommodations. They say choice should be available to students for classwork and homework, as long as those tasks meet the learning objectives for the lesson.

Evidence of Understanding

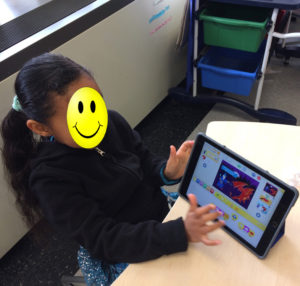
When I created my Minecraft Assessment where students explore and create symmetrical designs, I demonstrated just one way in which Minecraft could be used as an assessment as learning and an assessment of learning. This engaging and fun assessment could be one of a menu of assessment choices, which would support UDL as multiple means of action and expression.

Screen Shot of Sarah’s Symmetry Station in MinecraftEDU

Looking Toward the Future of My Assessment Practice

As I move forward in my teaching practice, I will continue to utilize what I have started to implement through my work in CEP813. I will continue to use feedback to inform instruction, and I will continue to use digital tools for blended learning.

Digital tools, such as Seesaw, Canvas, Minecraft, Tynker, and Scratch will continue to be a vital part of my instruction and assessment practice. They will be part of my practice as my students do inquiry-based instruction in small groups and I am able to “meet” with them each day through tools like Seesaw. Formative assessment through this blended-learning format will allow me “to adjust ongoing teaching and learning to improve students’ achievement of intended instructional outcomes” (FAST SCASS, as cited in Quellmalz, 2013, p. 1).

Images

Header image Learning For Life is licensed under CC0 Public Domain.

Screenshots in this blog post were created by Sarah Van Loo.

REFERENCES

Black, P. & Wiliam, D. (1998). Inside the black box: Raising standards through classroom assessment. Phi Delta Kappan, 80(2), 139-144.

CAST (n.d.). LMS data and continual course design. Retrieved from http://udloncampus.cast.org/page/assessment_data#.VEq4B5PF8rk

Hattie, J., & Timperley, H. (2007). The power of feedback . Review of Educational Research, 77(1), 81–112.

Meyer, A., Rose, D.H., & Gordon, D. (2014). Universal design for learning: Theory and practice. Wakefield, MA: CAST.

Quellmalz, E.S. (2013). Technology to support next-generation classroom formative assessment for learning. San Francisco: WestEd. Retrieved from http://www.wested.org/resources/technology-to-support-next-generation-classroom-formative-assessment-for-learning/

Sams, A., & Bergmann, J. (2013). Flip your students’ learning. Educational Leadership, 16-20.

Trumbull, E. & Lash, A. (2013). Understanding formative assessment: Insights from learning theory and measurement theory. San Francisco: WestEd. Retrieved from www.wested.org/online_pubs/resource1307.pdf

Wormeli, R. (2010, November 30). Rick Wormeli: Formative and summative assessment [Video file]. Retrieved from https://www.youtube.com/watch?v=rJxFXjfB_B4&feature=youtu.be

Robotics in Grade 5 – A Formative Assessment

My fifth-grade robotics classes are challenging and fun. Students work cooperatively in small groups to build, modify, and program a robot to move autonomously (with minimal human intervention) while also learning to navigate social learning situations.

To plan for and reflect on one of the formative assessments within this fifth-grade robotics module, I have developed Formative Assessment Design Version 3.0, the third iteration of this assessment. 

You may also read prior iterations, Formative Assessment Design Version 1.0 and Formative Assessment Design Version 2.0, as well as my blog posts about FAD 1.0 here or FAD 2.0 here.

Assessment Rubric 4.0: Including Technology and Universal Design for Learning

Over the past six weeks, I have been developing and revising a rubric by which to assess other assessments. Here are links to previous iterations and the blog posts that I wrote about them:

This week’s final iteration is Rubric 4.0, which I have updated to include criteria specifying the importance of a technology component in assessment and Universal Design for Learning (UDL). Universal Design for Learning stresses the importance of providing multiple means of engagement, representation, and action and expression to make education accessible for all students (Meyer, Rose, & Gordon, 2014).

References

Meyer, A., Rose, D.H., & Gordon, D. (2014). Universal design for learning: Theory and practice. Wakefield, MA: CAST.

Assessing My Own Assessment

Assessment is an important topic in education, with teachers, administrators, parents, students, and policymakers all staking a claim to the results of various types of assessments (NWEA, 2015).

Assessment can be used to inform teaching and provide feedback to students. When used effectively, it can “support and enhance learning” (Shepard, 2000, p. 4).

Testing is just one form of assessment. Drawing by Sarah Van Loo, 2017.

In an effort to improve my assessment practices, I critically examined one of my own assessments. First, I chose three elements that “make it possible for assessment to be used as part of the learning process” (Shepard, 2000, p. 10).  Then I began drafting a rubric with which to assess other assessments, Rubric 1.0. As the name implies, this rubric is a work-in-progress.

Rubric for an Art Project

The word assessment can refer to both the instrument and the process (MAEA, n.d.). The assessment tool that I chose to examine is a rubric for a comic strip. The last time I used this assessment tool was a few years ago. Nevertheless, I created it using a format that I often use for middle school art rubrics, so I think it is useful to examine it.
The assessment process was a project, the creation of a comic strip by each student in my middle school art class. The purpose of this assessment was to evaluate students’ understanding of craft, character development, story, and the basic elements of a comic strip, through their creation of a comic strip.

When I created this assessment tool, I made the assumption that my students were able to read and interpret each of the criteria and descriptions. I also made the assumption that my students understood the vocabulary used in the assessment tool.

Examination of My Comic Strip Rubric

Assessment doesn’t have to be a monster. Drawing by Sarah Van Loo, 2017.

In examining my rubric, I assessed whether it met the three criteria I used to create Rubric 1.0: feedback to students is direct and specific, learning targets are transparent, and it includes a component of self-assessment by the student.

Feedback to Students is Direct and Specific

According to Black and Wiliam (1998), feedback to students should be direct and specific, giving advice to students so they know what can be improved. This helps students recognize their own ability to improve.

In my experience, students sometimes view themselves as “talented” or “not talented.” With specific feedback about their own performance, they develop a growth mindset and learn that they can improve regardless of where they started.

The comments section of my assessment tool provides a space to provide specific feedback to students. If the teacher does not use the comments section but only circles the pre-written descriptions, students may view this feedback as vague.

Learning Targets are Transparent

Students should have access to the criteria by which they will be graded, providing them with the opportunity to strive for excellence and the ability to see the “overarching rationale” of classroom teaching (Black & Wiliam, 1998, p. 143).

I have noticed that when students have clear expectations laid out for them, it prevents a lot of questions from being asked. Students do not need to ask or guess what quality work looks like because clear guidelines have already been established.

The comic strip rubric sets forth clear expectations for quality of work, quantity of work, and use of time in class. It is possible that more elements of a good comic strip could be added, but this rubric sets forth standards for excellent work, as well as work that could be improved.

Includes a Component of Self-Assessment by The Student

When students assess their own work, the criteria of the assignment and feedback from others becomes more important than the grade alone. Students who assess their own work usually become very honest about it and are prepared to defend their work with evidence (Shepard, 2000).

Students who assess their own work are prepared to defend their work with evidence.

When students assess their own work, they use what they discover to improve their own work. I have noticed that they iterate on their projects and make improvements, without prompting.

The comic strip rubric allows for student self-assessment, providing one bonus point for doing it. In my experience, this provides an incentive for some students. Other students do not see the inherent value and therefore pass on assessing themselves. Rather than making it an optional bonus point, it could be a required element of the rubric.

Conclusion

At this point, the comic strip rubric does include the elements of Rubric 1.0. As I revise Rubric 1.0, though, I expect to discover ways to improve my comic strip rubric.

REFERENCES

Black, P. & Wiliam, D. (1998). Inside the black box: Raising standards through classroom assessment. Phi Delta Kappan, 80(2), 139-144.

MAEA. (n.d.). CEP 813 module 1.1 introduction. Retrieved from https://d2l.msu.edu/d2l/le/content/585048/viewContent/5241064/View

NWEA. (2015). Assessment purpose. Retrieved from https://assessmentliteracy.org/understand/assessment-purpose/

Shepard, L. (2000). The role of assessment in a learning culture. Educational Researcher, 29(7), 4-14.

Beautifully Questioning My Teaching Practice

As I prepared to do this, my final project for my three summer classes, I was stuck. These classes have been exhilarating, challenging, and rewarding. Sometimes there were tears, both frustrated and proud.

Today I created something wonderful and hoped that the excitement from that would fuel me through this post. It didn’t. The hard part is that after so many weeks of pushing myself so hard, my brain was stuck.

So I looked at Twitter, read some news, looked at the ceiling. Nothing. One of

First-graders love coding using ScratchJr

my objectives for the assignment was to apply Warren Berger’s Why, What If, and How questioning methodology from A More Beautiful Question (Berger, 2016) to my own practice. So I eventually, begrudgingly started with that.

I began with creating a list of Why questions related to my teaching. I teach Project Lead The Way (PLTW) to students K-5 in two schools. I teach engineering concepts to all my students and coding to all my students except my kindergarteners.

Unsticking the Lid

As soon as I started asking questions, my imagination took flight. As Frances Peavey once said, a good question is like “a lever used to pry open the stuck lid on a paint can,” (Berger, 2016, p. 15). That was it! I simply needed to start asking questions and I was unstuck, just like the lid of the paint can.

As Berger suggests, I started by asking Why questions. If we’re paying attention, we ask Why when we encounter a suboptimal situation (Berger, 2016). Although I love my job and most of my students enjoy my classes, there are some who just don’t. Those students led me to ask:

Why?
  • Why do some students keep asking if they’re doing the problem “right”?
  • Why do some of my students think they can’t code?
  • Why do some of my students refuse to participate?
What If?

As I considered my Why questions, I focused on the fact that “Integrating coding into classes is being perceived by many as a way to stimulate computational and creative thinking,” (Johnson, Becker, Estrada, Freeman, 2015, p.21). Therefore, I decided to address the question: Why do some of my students think they can’t code?

The ScratchJr coding environment is user-friendly for young students, but still offers the opportunity to learn computational thinking.

Pondering this question, I realized that my first and second-grade students have great confidence when it comes to coding. It is my third through fifth-grade students who are more likely to struggle.

With my Why question in my mind, I began to ask What If. During this time of creative, wide open questioning, I asked What If questions to help me consider possibilities for change (Berger, 2016).

  • What if I let my older students start with ScratchJr (typically only first and second graders use ScratchJr)?
  • What if I made time for Hour of Code or other warm-up activities before starting on our unit together?
  • What if I ran an after-school coding club?
  • What if I work more closely with the media specialist to coordinate coding lessons?
How?

Asking How is about focusing on making progress toward a solution, about deciding which ideas to pursue (Berger, 2016). One of the great conundrums of my schedule is that I never seem to have enough time.

I co-teach, pushing materials into each classroom, typically for a couple of weeks at a time. When I’m in a class I have so much to do to complete a module. Also, I don’t want to waste any of the classroom teacher’s time. Therefore, I carefully avoid straying from my lesson plans. The problem is that some of my students simply need more. So I asked How…

  • How can I find time to let some students practice coding more outside of class?
    • After school
    • During lunch
    • On my prep hour
    • During other periods in the school day with a PLTW iPad
    • During other periods in the school day using another device

This practice could be with ScratchJr or with the app they’ll use during PLTW. It could even be a different app, as long as they get the opportunity to practice the computational thinking they need to improve their coding skills and gain confidence.

Next Steps

Prior to completing this assignment, I had vaguely considered this issue in the past but hadn’t gotten much past that. By taking the time to do this questioning process, I feel like I’ve taken my first steps toward solving a complex problem in my practice. My next step will be to talk to my classroom teachers to figure out how we can work together on behalf of our students.

References

Berger, W. (2016). A more beautiful question: The power of inquiry to spark breakthrough ideas. New York: Bloomsbury.

Johnson, L., Becker, S. A., Estrada, V., & Freeman, A. (2015). NMC horizon report: 2015 K-12 edition. Austin, TX: The New Media Consortium.

Images

All images in this blog post were created by Sarah Van Loo.

Redesigning a Classroom Space for 21st-Century Learners

When I considered the ideas of TheThirdTeacher+ (O’Donnell, Wicklund, Pigozzi, Anderson, & Mau, 2010) and how I could apply them to redesigning my classroom for 21st-century learners, I found the challenge exciting. Using the questioning technique (Why? What If? How?) from A More Beautiful Question allowed me to consider the design challenge from various perspectives (Berger, 2016).

Why redesign the classroom?

In my current teaching position, I teach K-5 STEAM curriculum in two elementary schools and travel with my teaching materials on carts. Since I don’t have a classroom of my own to redesign, I imagined a typical classroom space in one of my two schools. I chose a 25’ x 35’ rectangular space with one door and two large windows with a large closet for storage and tools.

More than one classroom in both schools featured old, heavy, rectangular desks in rows. That kind of classroom arrangement began as far back as the Civil War and continued to thrive as factory workers were educated in the early 1900s (Stoll Dalton, 1998). That kind of classroom was what I envisioned as a took on the redesign challenge.

My goal in redesigning my classroom is to create a context for educating students in 21st-century skills. These include communication, collaboration, systems thinking, creativity, and analytical habits (Long, 2012).

Overhead view of redesigned classroom for 21st-century learners

This classroom has spaces for students to work individually, in small or large groups, at tables, standing, or in comfortable spaces. By facing each other instead of the front of the room, I am creating a space that is student-centered.

What If?… Reimagining the classroom

The Third Teacher proposes 79 Ways You Can Use Design to Transform Teaching + Learning (O’Donnell et al., 2010). Using many of these design suggestions, I considered how the space could be restructured and improved.

This space reflects current mindsets about learning. In my classroom, I “make peace with fidgeting” (#20) by incorporating VS chairs that are designed to allow students to rock slightly, sit in the chair backward, and even sit on the backs of the chairs. It “cherishes children’s spaces” (#3) with large rugs and beanbags and a space with a couch and soft chairs (O’Donnell et al., 2010).

Soft spaces are inviting for children and promote collaboration.

My design “makes classrooms agile” (#23)  by incorporating wheeled tables and whiteboards that allow the spaces to be easily reconfigured for multiple purposes. It is “designed for speech and hearing” (#8) by including sound-absorbent rugs and soft furniture, as well as a sound field. With this device in the room, the teacher can speak in an even tone and all students can still hear well.

The space “supports great teachers” (#12) by removing the teacher desk. The teaching equipment is mobile, allowing the teacher to support students where they are (O’Donnell et al., 2010).

A mobile teaching center allows the teacher to move around the classroom.

How Will We Redesign The Learning Space?

I illustrated my reimagined learning space including rolling tables, child-friendly chairs, and multiple spaces for small groups. I included plants, lamps, modern educational technologies, lots of storage space, and great maker tools (a laser cutter, 3D printer, and vinyl cutter).

Rolling tables and whiteboard allow the classroom to be easily reconfigured. Stand up desks allow an alternative to sitting at tables.

The decisions I made in my design were partly limited by the availability in SketchUp’s 3D Warehouse. For example, VS makes wheeled tables with rounded corners that can be reconfigured in myriad ways. These tables were not available in the warehouse, so I opted to use rectangular tables that do not have the same range of options for arranging them.

According to Experience Design, students’ experience includes their participation in the room and with each other. It also entails emotion so it’s important to consider how they will feel in the space (van Gelderen, 2010).

A cafe table is a fun space for students to collaborate with each other or meet with the teacher.

My design allows us to “open the doors” (#60), “display learning” (#15), and “emulate museums” (#16). These all involve displaying student’s work as though the classroom were a gallery space. I included multiple open shelving units and blank walls (O’Donnell et al., 2010).

Digital fabrication tools for student use: laser cutter, 3D printer, and vinyl cutter

I would know if the classroom redesign met students’ needs in several ways: Are students using the space more collaboratively? Are they independently using the unique resources of the room, such as the laser cutter? Have they taken ownership over the classroom gallery of student work?

Closing Thoughts

The space itself can only go so far: I have to use it wisely. As a teacher, I must make the choice to use different spaces differently (#10), allow students to have a choice about what they want to do (#14), and allow for uniting art and science (#18) (O’Donnell et al., 2010).

References

Berger, W. (2016). A more beautiful question: The power of inquiry to spark breakthrough ideas. New York: Bloomsbury.

Long, C. (2012). Teach your students to fail better with design thinking. Learning & Leading with Technology,16-20. Retrieved from https://static1.squarespace.com/static/509c0d15e4b058edb8f35a86/t/50f49750e4b0c7661ad2efc5/1358206800803/FailBetter_DesignThinking ISTE article.pdf.

O’Donnell, Wicklund, Pigozzi, Anderson, & Mau, B. (2010). 79 Ways You Can Use Design to Transform Teaching Learning. Retrieved from https://static1.squarespace.com/static/509c0d15e4b058edb8f35a86/t/50ec7ca4e4b01d8c697c0b6c/1357675684568/79 Ideas Overall List.pdf

Stoll Dalton, S. (1998). Pedagogy matters: Standards for effective teaching practice(pp. 1-49, Rep. No. 4). Santa Cruz, CA: Center for Research on Education, Diversity & Excellence. (ERIC Document Reproduction Service No. ED 424 769)

Van Gelderen, T. (2010, February 09). Retrieved August, from https://www.youtube.com/watch?v=BB4VFKn7MA4

Images

All images in this blog post were created by Sarah Van Loo using SketchUp.

I Completed My First Arduino Project

This summer I made something that I am really proud of! I illuminated a tutu with a LilyPad Arduino using only online resources. I was challenged to set aside traditional learning resources, which I wrote about in an earlier post.

My Struggles

In a previous post on this topic, I wrote about my lack of experience with this platform. I also wrote about switching between Uno and LilyPad.

After I got my Uno controlling a series of LEDs on a breadboard, my next step was to code the Uno to control four NeoPixel LEDs. I installed the NeoPixel library in the Arduino IDE.

I coded a simple sketch to illuminate the NeoPixels. Then I pulled in an example sketch from the NeoPixel library. The steps in coding are: write the sketch, verify it, then upload it. In my experience coding, if error messages come back at either the verify or upload stage, the sketch will not work.

I got a message when I attempted to upload my sketch that said, “User configuration file does not exist or is not a regular file, skipping.” In RED. That was one of approximately 60 lines in the error message.

So I researched. For hours, I read Internet help forums in which other Arduino Makers had reported the same error. From what I could find, it appeared that my version of Mac OS was not going to work with Arduino. I began to envision having to scrap this project and start over. I spent at least four hours reading and uninstalling and reinstalling the Arduino IDE. I even opened the Mac Terminal and considered manually inputting some instructions directly into the command line.

Then it happened. After hours of reading and more than a few tears shed, I found it. On the Arduino Product Forum, someone had written, “Don’t worry, it’s not an issue to have this message – it will use the supplied default. :)” The smiley face was really included in the forum post. I am sure I had read this message ten times. This time, though, I realized what it meant: my code would work, in spite of the error message. I tried one more time and it worked!

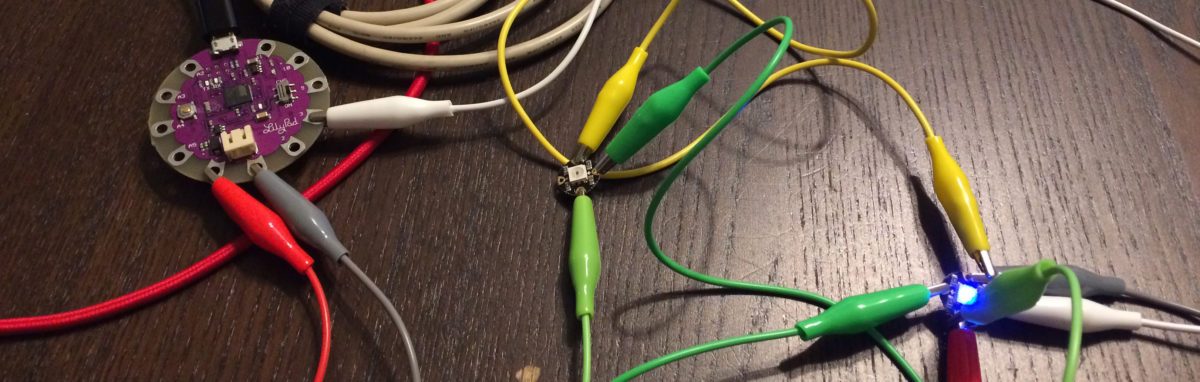
My troubles weren’t over, however. When I tried to switch from the Uno to the LilyPad, I discovered that my LilyPad had gotten broken so I ordered a new one. Once it arrived, I was finally able to switch from the Uno to the LilyPad and got my LilyPad to light up the NeoPixels.

My Success

Next, I connected all the NeoPixels to the LilyPad using wire and electrical tape. It would have been more elegant to use conductive thread but I made this choice in the interest of time.

Finally, I moved the LilyPad to battery power. I attached my daisy-chained NeoPixels and the LilyPad to the tutu. The results were lovely, and I was delighted.

As Jaymes Dec, teacher and Innovation Specialist says of digital tools, including Arduino, “I really want my students to lose their fear of failure,” (Burker, 2015, Loc 1731). I can attest to the fact that I truly thought I was about to fail during this project. In the end, I succeeded. I made something I didn’t know I could make and I learned a lot about microprocessors and myself in the process. Through persistence, I can figure out just about anything. And when something is so difficult that it hurts, overcoming is the sweetest success!

please watch my maker video about how I completed this project:

Resources That I Used For Learning Arduino
If you’re interested in getting started with Arduino, you may also enjoy the extended edit of my maker video:

Related Posts

This is the third of three posts about learning to code the Arduino. You can read about my decision to make this project in my first post. You can read an update about my early progress in my second post.

References

Burker, J. (2015). The invent to learn: Guide to fun. Torrance, CA: Constructing Modern Knowledge Press. Retrieved from https://www.amazon.com/Invent-Learn-Tinkering-Engineering-Classroom-ebook/dp/B00CQDRF84/ref=sr_1_1_twi_kin_1?ie=UTF8&qid=1501470374&sr=8-1&keywords=kindle+invent+to+learn

Images

All images and videos in this blog post were created by Sarah Van Loo.

We Made a Maker Faire!

Our flyer was created by MAETy1 students

One of the bigger surprises of my on-campus experience at Michigan State University was learning that my classmates and I would be making a maker faire. With some help, our group of eight students did most of the work: overseeing the logistics, advertising, planning and running all the booths for visitors.

The Maker Movement and Maker Faires

Making is an important part of my teaching practice. You can read more about it in an earlier blog post I wrote. According to the theory of constructivism, when people make something, they build their own knowledge. They construct new knowledge based on prior knowledge, through direct instruction and through inquiry-based learning (“Constructivism,” 2016).

This understanding has helped spark the Maker Movement and the relatively recent popularity of maker faires around the world. Maker faires are gatherings that range in size and scope, but often include a combination of hands-on activities and demonstrations.

Our Faire

Our maker faire was small, with four booths run by our eight students. Nevertheless, it was well-received by those who attended. Our visitors were engaged and seemed to struggle productively, learn and have fun.

If I were to help plan a maker faire again, I hope we would have more than nine days to plan it. I would include ample signage throughout our event area to help ensure that people could find their way around. As it was, I made a few signs even as the event was getting started.

Our passport was created by MAETy1 students

I would also advertise it as widely as possible. Many people in my cohort shared on social media and in the local news outlets, but more time would allow us to share even more.

Through this event, I learned that it is difficult to keep everyone in the loop when there are eight people involved in planning. When it came to the day of the event, though, it was extremely helpful to have more people pitching in. If I were to do this again, I would request as much community assistance as possible.

Our Booth

My partner Kate Wojtas and I planned and ran a tower building challenge. Participants built a tower of spaghetti and marshmallows, as tall as possible. They had the opportunity to do iterations of their building, and learned about engineering principles, including trusses and cross braces.

If visitors struggled or got stuck, they were ready for teaching by telling (Bransford, Brown, & Cocking (2000). We then asked some guiding questions like, “What can you do to make this more stable, so it doesn’t fall?” We also gave a little information about engineering design, if necessary.

I enjoyed celebrating with builders of all ages. One of the most exciting aspects of watching learners at a maker activity was seeing how they are empowered. When faced with a challenge, our participants struggled, prevailed, and learned that they could do it. Even when their tower fell down, we celebrated with, “You tried! You can try again! How can you do it differently this time?”

Make a Maker Activity

You don’t have to plan an entire maker faire to engage learners in thought-provoking inquiry-based activities. If you are looking for such an activity for your classroom or maker event, tower building challenges are a great option. Here is a link our brainstorming document and to our plan:

Tower Advice

Plan for participants to spend 15-20 minutes on this activity. This activity is sticky, so have hand wipes available for participants, check the floor regularly for dropped marshmallows, and have a cleaning solvent ready to clean the tables at the end. Also, do not expect to reuse materials between participants because used marshmallows are sticky. Really, really sticky.

Preparation and practice are key! Preparation for this activity reminded me again of the importance of trying out an activity before introducing it to students. Even if you have researched the activity or done it before, practice it again. Try to anticipate learners’ questions.

Even after my own preparation and trials, we made a big change to our plan. Some young people tested our activity before we took it to the faire, which was incredibly helpful. Based on that practice, we changed our plan from using straws to using spaghetti. Because spaghetti is brittle, it adds to the challenge and allows participants to easily use different sizes of spaghetti for building.

If you don’t have the opportunity to evaluate your challenge with practice participants first, try doing it again from a different perspective. Literally, try sitting in a low chair to see what your event looks like from a young child’s perspective.

Finally, be engaged and have fun!

References

Bransford, J. D., Brown, A. L., & Cocking, R. R. (Eds.). (2000). How people learn: Brain, mind, experience, and school: Expanded edition. Washington, DC: National Academy Press.

Constructivism. (2016, September 08). Retrieved from https://www.learning-theories.com/constructivism.html

Images

Unless otherwise captioned, all images and videos in this blog post were created by Sarah Van Loo.

I’m Going to Learn to Code Arduino!

For my summer 2017 classes in my coursework at Michigan State University (Master of Arts in Educational Technology), I am being challenged to learn something new using only online resources, such as YouTube, my professional learning network, and Internet help forums. When this challenge was issued, I immediately gravitated toward learning to program Arduino.

WHY ARE WE DOING THIS?

This period in education is an exciting one, one in which many students have technology at their fingertips. Although social media can be a distraction, it can also be a tool in the classroom. According to Ito et al. (2013), we can utilize social media for connected learning, and through connected learning, some equity gaps we see in school can be closed.

Wealthy families have already taken advantage of technology to provide additional learning experiences for their children, widening the equity gap. Nevertheless, through the power of connected learning, all students have access to a network of peers and caring adults. When using social media for learning, subject matter becomes “interest-powered,” relevant, and interesting to the learner (Ito et al., 2013, p. 4).

This is an ambitious project; however, by undertaking this, I will gain meaningful and firsthand experience with the power of connected learning. And through this experience, I expect to become an avid proponent of this method of learning.

INSPIRATION

I am an artist and maker. I especially love to make things that are 3-dimensional and interactive, such as a sculpture I once made. When the viewer pressed a button, a light illuminated the inside of the sculpture for a few seconds, then flickered and went out. That light was controlled by Arduino.

An Arduino Uno microcontroller controlled the light in this sculpture

The making of that sculpture was exciting, and allowed me to grow as an artist. I learned about making boxes, pushed my Photoshop skills, and designed and crafted a mechanism that made the images inside change, among other skills. However, when it came to that Arduino, I was stuck. Without time to learn the processes of coding and soldering that would be required to make that Arduino do what I wanted, I solicited the services of my husband to make the electronics work. Many times I have reflected on that sculpture as one of my favorite artworks that I have made, but that at the same time showed one of my shortcomings as a maker.

WHAT I’M GOING TO DO

Arduino is a favorite tool of artists and makers. It is a programmable microcontroller. While I am still figuring out what exactly that means, I do understand that it involves a small piece of hardware (smaller than a phone) that can be programmed using Arduino software. It can process a variety of inputs, and give some sort of output.

Although Arduino is capable of producing many types of output, I will program my Arduino to do something with light. I plan to use my newly programmed microcontroller to illuminate a tutu that my daughter has. There are many resources on the Internet for using Lilypad Arduino, including an article by Gadget Hacks, How to Embed Lights Into Fabric and Clothes with LilyPad.

Here is just one example of an Arduino microcontroller being used by an artist. This image is of a Lilypad Arduino in use:

To get started with preparing for this project, I bookmarked just a few of the many Arduino resources that are available on the Internet:

Related Posts

This is the first of three posts about learning to code the Arduino. You can read an update about my early progress in my second post. You can read about how it all worked out in my third post.

References

Ito, M., Gutiérrez, K., Livingstone, S., Penuel, B., Rhodes, J., Salen, K., . . . Watkins, S. (2013). Connect learning: An agenda for research and design: A research synthesis report of the Connected Learning Research Network (summary) (Rep.). Irvine, CA: Digital Media and Learning Research Hub.

Images

Iwasaki, O. (Photographer). (2009). A flexible Lilypad Arduino sewn in textiles with 20 LEDs which fade in and out at random [digital image]. Retrieved from Wikimedia Commons website: https://commons.wikimedia.org/wiki/File:Lilypad_Arduino_with_fading_LEDs.jpg

All other images in this blog post were created by Sarah Van Loo.