Learning Arduino: An Update

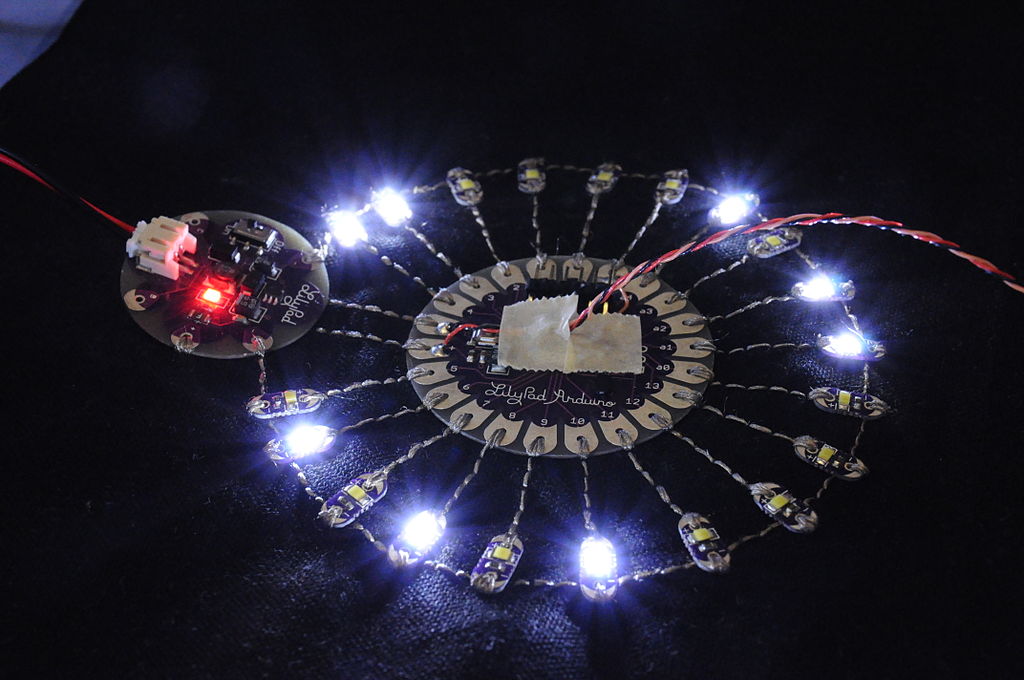
In an earlier post, I introduced a challenge I set for myself: to learn to code an Arduino microprocessor using only resources that are available online. Ultimately, I will program my LilyPad Arduino USB to illuminate my daughter’s tutu with LEDs.

My Arduino Workspace

Arduino and Me

When I began this adventure, I had little experience with microprocessors, programming, or circuits. My limited experience was from teaching Vex robotics in a tightly scaffolded environment, where it is almost impossible to wire inputs and outputs incorrectly.

This project has been a huge stretch for me, but it is worth it. I wrote in an earlier post about Seymour Papert, the father of making and the theorist behind constructionism. Papert, as cited in Burker (2015), said that there are “Eight Big Ideas Behind the Constructionist Learning Lab” (Loc 1687). I am constructing my own learning by doing, using technology as a building idea, having hard fun, and making to learn – the first four of those eight big ideas.

First Steps

I began by installing the Arduino IDE software on my computer so that I can code my Arduino. I wrote some sketches, instructing my Arduino to blink on and off one second at a time, then on and off 1/10 second at a time.

I began with Blum’s tutorial. Each time I got stuck, I referred to the Getting Started guide. Next I began watching a series of five videos from I Like to Make Stuff. Those videos provided a solid foundation of vocabulary and content knowledge, and helped me move to the next step.

Then Things Got Confusing

LilyPad Arduino

Arduino Uno

Things went pretty smoothly with the I Like to Make Stuff videos until Arduino Programming Part 3 // Maker 101. In that video, Bob Clagett gives instructions on how to program the Arduino to send a message to make an LED blink at different rates using a potentiometer. He sets up the circuit using a breadboard.

At this point, a few things happened at once. Having never used a breadboard,  I concurrently began watching Simply Electronics’ How to Use a BreadBoard. My head was swimming with electronics information, and this was the third YouTube content creator in a row to demonstrate using the Arduino Uno. The Uno is a popular Arduino board.

Thankfully, I had an Arduino Uno available in addition to the LilyPad. Instead of watching videos featuring Uno and trying to translate them for LilyPad, I decided to switch gears and use the Uno instead. It was a huge help. I was then able to use How to Use a BreadBoard to create a circuit with multiple LEDs on a breadboard where the Arduino acted as a power supply.

Then, once I had done that, I was able to follow along with Arduino Programming Part 3 // Maker 101 and make a circuit with one LED and a potentiometer. The potentiometer allowed me to control the rate that the LED was blinking.

Finally, I used my knowledge from the breadboard video to add a second LED that was powered and controlled by the Arduino. The blinking rates of both LEDs could now be controlled by the potentiometer.

Next Steps

I have created a circuit with Arduino Uno instructing two LEDs to blink at a rate that is controlled by a potentiometer. My next step is to figure out how to swap my LilyPad in as the microcontroller, then to learn more about the different kinds of inputs and outputs I can use with my LilyPad.

related posts

This is the second of three posts about learning to code the Arduino. You can read about my decision to make this project in my first post. You can read about how it all worked out in my third post.

References

Burker, J. (2015). The invent to learn: guide to fun. Torrance, CA: Constructing Modern Knowledge Press. Retrieved from https://www.amazon.com/Invent-Learn-Tinkering-Engineering-Classroom-ebook/dp/B00CQDRF84/ref=sr_1_1_twi_kin_1?ie=UTF8&qid=1501470374&sr=8-1&keywords=kindle+invent+to+learn

IMAGES

All images and videos in this blog post were created by Sarah Van Loo.

We Made a Maker Faire!

Our flyer was created by MAETy1 students

One of the bigger surprises of my on-campus experience at Michigan State University was learning that my classmates and I would be making a maker faire. With some help, our group of eight students did most of the work: overseeing the logistics, advertising, planning and running all the booths for visitors.

The Maker Movement and Maker Faires

Making is an important part of my teaching practice. You can read more about it in an earlier blog post I wrote. According to the theory of constructivism, when people make something, they build their own knowledge. They construct new knowledge based on prior knowledge, through direct instruction and through inquiry-based learning (“Constructivism,” 2016).

This understanding has helped spark the Maker Movement and the relatively recent popularity of maker faires around the world. Maker faires are gatherings that range in size and scope, but often include a combination of hands-on activities and demonstrations.

Our Faire

Our maker faire was small, with four booths run by our eight students. Nevertheless, it was well-received by those who attended. Our visitors were engaged and seemed to struggle productively, learn and have fun.

If I were to help plan a maker faire again, I hope we would have more than nine days to plan it. I would include ample signage throughout our event area to help ensure that people could find their way around. As it was, I made a few signs even as the event was getting started.

Our passport was created by MAETy1 students

I would also advertise it as widely as possible. Many people in my cohort shared on social media and in the local news outlets, but more time would allow us to share even more.

Through this event, I learned that it is difficult to keep everyone in the loop when there are eight people involved in planning. When it came to the day of the event, though, it was extremely helpful to have more people pitching in. If I were to do this again, I would request as much community assistance as possible.

Our Booth

My partner Kate Wojtas and I planned and ran a tower building challenge. Participants built a tower of spaghetti and marshmallows, as tall as possible. They had the opportunity to do iterations of their building, and learned about engineering principles, including trusses and cross braces.

If visitors struggled or got stuck, they were ready for teaching by telling (Bransford, Brown, & Cocking (2000). We then asked some guiding questions like, “What can you do to make this more stable, so it doesn’t fall?” We also gave a little information about engineering design, if necessary.

I enjoyed celebrating with builders of all ages. One of the most exciting aspects of watching learners at a maker activity was seeing how they are empowered. When faced with a challenge, our participants struggled, prevailed, and learned that they could do it. Even when their tower fell down, we celebrated with, “You tried! You can try again! How can you do it differently this time?”

Make a Maker Activity

You don’t have to plan an entire maker faire to engage learners in thought-provoking inquiry-based activities. If you are looking for such an activity for your classroom or maker event, tower building challenges are a great option. Here is a link our brainstorming document and to our plan:

Tower Advice

Plan for participants to spend 15-20 minutes on this activity. This activity is sticky, so have hand wipes available for participants, check the floor regularly for dropped marshmallows, and have a cleaning solvent ready to clean the tables at the end. Also, do not expect to reuse materials between participants because used marshmallows are sticky. Really, really sticky.

Preparation and practice are key! Preparation for this activity reminded me again of the importance of trying out an activity before introducing it to students. Even if you have researched the activity or done it before, practice it again. Try to anticipate learners’ questions.

Even after my own preparation and trials, we made a big change to our plan. Some young people tested our activity before we took it to the faire, which was incredibly helpful. Based on that practice, we changed our plan from using straws to using spaghetti. Because spaghetti is brittle, it adds to the challenge and allows participants to easily use different sizes of spaghetti for building.

If you don’t have the opportunity to evaluate your challenge with practice participants first, try doing it again from a different perspective. Literally, try sitting in a low chair to see what your event looks like from a young child’s perspective.

Finally, be engaged and have fun!

References

Bransford, J. D., Brown, A. L., & Cocking, R. R. (Eds.). (2000). How people learn: Brain, mind, experience, and school: Expanded edition. Washington, DC: National Academy Press.

Constructivism. (2016, September 08). Retrieved from https://www.learning-theories.com/constructivism.html

Images

Unless otherwise captioned, all images and videos in this blog post were created by Sarah Van Loo.

Squishy Circuits are one tool students can explore while making.

Making to Learn

As both as an art teacher and as a technology teacher, I have found one thing to be consistent: most children love to make things, although their creations are as different as the children who make them. Whether they are making a painting or sculpture in art class, or a robot or ScratchJr animation in technology class, students who are making are almost always engaged. When I hear other educators reflect on the difficulty of keeping students engaged in class, I typically can think of just a handful of students in the entire school who are not engaged in my classes. Knowing how completely engaged my own students are when making, I understand why making and the “maker movement in education,” are topics that everyone wants to discuss.

So, What is Making?

While some people think of making only in terms of modern technologies, like coding, circuits, and robotics, it refers to the creation of just about anything. According to Dale Dougherty, founder of Make Magazine, every one of us is a maker (Dougherty, 2011). He says we shouldn’t think of makers as inventors, because most people have a difficult time thinking of themselves that way. Instead, he says we should consider making to be more like tinkering: the ability to repair things or make things from scratch. This lost art seems to have been found again, but with a new name: making.

When my daughter learned to sew the ribbons on her ballet shoes, she gained confidence and took ownership. Wearing those shoes next to other dancers brought a sense of community.

Making is born out of two basic human needs: the need to create, and the need to be part of a community, to be social (Martinez & Stager, 2014). Our need to create can be fulfilled by making anything – a handmade dress, a clay bowl, a painting, a good meal, a refurbished engine, or anything else you can imagine. And our need to be part of a community helps to explain the increasing development of hackerspaces, Maker Faires, and other social gatherings that surround making. Dougherty (2011) says of the social aspect of making, “The opportunity to talk about that object, to communicate about it, to tell a story about it is another way we learn at the same time we teach others,” (p. 12). In other words, people love to get together, talk about what they made, and see what others have made.

This definition of making explains why my so many of my students are excited to create the sculpture or the robot,  and why they are also excited to tell everyone about it. It’s why setting aside time in class for sharing is so important. According to Seymour Papert’s theory of constructionism, when students tell about what they make, they learn. Constructionism, according to Martinez & Stager, is “learning by constructing knowledge through the act of making something shareable,” (as cited in Rosenfeld Halverson & Sheridan, 2014, p. 498). It is clear, therefore, that I need to carve out time for sharing to facilitate student learning.

Why is Making in Schools Important?

Whether they are presented with a problem, or identify a problem on their own, students who are makers become problem solvers and critical thinkers. When they figure out a solution for which there is not one single answer, they see themselves as “competent problem solvers who don’t need to be told what to do next,” (Martinez & Stager, 2014).

Building robots with 5th graders is a great experience for my students and me.

The challenge for me, as with every other teacher, is time. There simply isn’t enough of it. Even in a district like mine, where there is a concerted effort to implement project-based learning programs like the one I teach, there never seems to be enough time to cover it all.

What Can I Do?

I can make a conscious choice not to try to teach every single bullet point at a full sprint. I can choose, instead, to use the time I have with my students to cover what I can through student-led inquiry and problem-solving.

Every day, I am privileged to take interesting and engaging learning materials and new technologies into my classrooms. My students are primed to look for problems, figure out answers, make models, and share what they’ve learned. Yet with limited time available to me, I have often felt pressured to rush through teaching every concept.

Although I won’t be getting more time with my students next year, I will get a fresh opportunity to decide how to use the time I have. Instead of focusing on quantity, I am going to focus on quality. I will let my students share what they have made, and in the process, discover what they have learned.

Resources

Dougherty, D. (2011). The maker movement. innovations, 7(3), 11-14. Retrieved from http://www.mitpressjournals.org/doi/pdf/10.1162/INOV_a_00135

Martinez, S., & Stager, G. (2014, July 21). The maker movement: A learning revolution. Retrieved from https://www.iste.org/explore/articleDetail?articleid=106

Rosenfeld Halverson, E., & Sheridan, K. (2014). The maker movement in education. Harvard educational review, 84(4), 495-504. doi:10.17763/haer.84.4.34j1g68140382063

Images

All images and videos in this blog post were created by Sarah Van Loo.

I’m Going to Learn to Code Arduino!

For my summer 2017 classes in my coursework at Michigan State University (Master of Arts in Educational Technology), I am being challenged to learn something new using only online resources, such as YouTube, my professional learning network, and Internet help forums. When this challenge was issued, I immediately gravitated toward learning to program Arduino.

WHY ARE WE DOING THIS?

This period in education is an exciting one, one in which many students have technology at their fingertips. Although social media can be a distraction, it can also be a tool in the classroom. According to Ito et al. (2013), we can utilize social media for connected learning, and through connected learning, some equity gaps we see in school can be closed.

Wealthy families have already taken advantage of technology to provide additional learning experiences for their children, widening the equity gap. Nevertheless, through the power of connected learning, all students have access to a network of peers and caring adults. When using social media for learning, subject matter becomes “interest-powered,” relevant, and interesting to the learner (Ito et al., 2013, p. 4).

This is an ambitious project; however, by undertaking this, I will gain meaningful and firsthand experience with the power of connected learning. And through this experience, I expect to become an avid proponent of this method of learning.

INSPIRATION

I am an artist and maker. I especially love to make things that are 3-dimensional and interactive, such as a sculpture I once made. When the viewer pressed a button, a light illuminated the inside of the sculpture for a few seconds, then flickered and went out. That light was controlled by Arduino.

An Arduino Uno microcontroller controlled the light in this sculpture

The making of that sculpture was exciting, and allowed me to grow as an artist. I learned about making boxes, pushed my Photoshop skills, and designed and crafted a mechanism that made the images inside change, among other skills. However, when it came to that Arduino, I was stuck. Without time to learn the processes of coding and soldering that would be required to make that Arduino do what I wanted, I solicited the services of my husband to make the electronics work. Many times I have reflected on that sculpture as one of my favorite artworks that I have made, but that at the same time showed one of my shortcomings as a maker.

WHAT I’M GOING TO DO

Arduino is a favorite tool of artists and makers. It is a programmable microcontroller. While I am still figuring out what exactly that means, I do understand that it involves a small piece of hardware (smaller than a phone) that can be programmed using Arduino software. It can process a variety of inputs, and give some sort of output.

Although Arduino is capable of producing many types of output, I will program my Arduino to do something with light. I plan to use my newly programmed microcontroller to illuminate a tutu that my daughter has. There are many resources on the Internet for using Lilypad Arduino, including an article by Gadget Hacks, How to Embed Lights Into Fabric and Clothes with LilyPad.

Here is just one example of an Arduino microcontroller being used by an artist. This image is of a Lilypad Arduino in use:

To get started with preparing for this project, I bookmarked just a few of the many Arduino resources that are available on the Internet:

Related Posts

This is the first of three posts about learning to code the Arduino. You can read an update about my early progress in my second post. You can read about how it all worked out in my third post.

References

Ito, M., Gutiérrez, K., Livingstone, S., Penuel, B., Rhodes, J., Salen, K., . . . Watkins, S. (2013). Connect learning: An agenda for research and design: A research synthesis report of the Connected Learning Research Network (summary) (Rep.). Irvine, CA: Digital Media and Learning Research Hub.

Images

Iwasaki, O. (Photographer). (2009). A flexible Lilypad Arduino sewn in textiles with 20 LEDs which fade in and out at random [digital image]. Retrieved from Wikimedia Commons website: https://commons.wikimedia.org/wiki/File:Lilypad_Arduino_with_fading_LEDs.jpg

All other images in this blog post were created by Sarah Van Loo.

On Learning

As a teacher, I have so many responsibilities to consider on a day-to-day basis. It can be easy to get bogged down by all the little details of the classroom, like which students have a difficult time sitting next to whichever other students, and whether all photocopies are made or pencils have been sharpened. Nevertheless, there are two big issues that educators must prioritize, that need to be the central focus of the classroom. In fact, these two issues should drive the management of the classroom. These issue are: What is learning? And, what practices should I utilize in my own teaching to best support learning?

Figure 1. Learning can be enhanced through good pedagogy.

In many classrooms, there is an emphasis on memorizing facts. Dates, lists, and names are featured prominently in textbooks and on tests in many classrooms, making it appear as if the skill of memorizing data is a critical one (Bransford, Brown, & Cocking, 2000). But remembering data is not the same as learning and understanding content. While remembering refers to being able to recall facts for a short time and within a limited context, real learning is, according to Bransford et al. (2000), in part, about the ability to recall facts on an as-needed basis. It also entails being able to store those facts in long-term memory, organized within a bigger context of knowledge. Further, being able to apply those facts to solving problems, transfer learning across situations, and call facts to mind when needed are the results of true learning.

There are many teaching methods that can be implemented in order to help students to truly learn material, according to Bransford et al. (2000). Of those many teaching strategies, there are three specific strategies I can immediately implement in my classroom to aid in the learning process. First, I need to know my students’ prior knowledge about a subject, and either correct it or build upon it. Second, I need to take time to teach my students techniques for metacognition. Third, by utilizing all the aspects of an inquiry-based learning approach to instruction, my students will have greater opportunities to learn the content of my class.

Prior knowledge is a critical factor to be considered before any kind of instruction begins. In some cases, students may have correct prior knowledge about a topic. They may also possess no prior knowledge at all, or even incorrect prior knowledge. New knowledge, according to Piaget and Vigotsky (as cited by Bransford et al., 2000) is based on what students’ already know and believe, whether or not it is correct. Also, if they do not have any pre-existing knowledge, they will have a difficult time constructing learning. Whether formally or informally, I need to discover what my students’ prior knowledge is, so that I can help them to gain the prior knowledge they will need.

Forest

Figure 2.  When students live in the city and do not get to travel, they may not understand what a dense forest looks like.

A second teaching method that I can begin to employ immediately is to teach my students strategies for metacognition. Strategies for metacognition can, and should, be taught explicitly. Techniques such as predicting outcomes, activating background knowledge, and planning ahead, among others, are often thought to be developed on our own, yet are actually the result of cultural norms. By teaching our students strategies for metacognition, we empower them to “take control of their own learning by defining learning goals and monitoring their progress in achieving them,” (Bransford et al., 2000, p. 18).

Finally, the utilization of an inquiry-based learning approach to instruction can also make a significant impact on students’ learning. According to Bransford et al. (2000), middle school students who learned physics through inquiry-based instruction outperformed high school students who learned via conventional instruction, on physics problems in two different studies. An inquiry-based approach means students are presented with a problem to solve or question to answer, given time to research it, present what they have learned, and reflect on what did and did not work (Wolpert-Gawron, 2016). After a time of active struggle, students are ready for a time of teaching by telling (Bransford et al., 2000).

By considering my students’ prior knowledge, explicitly teaching metacognition, and utilizing all the features of an inquiry-based approach to instruction, I can make great strides toward helping my students learn in my classroom.

References

Ansonlobo. (Photographer). (2016). [digital image].  Retrieved from https://commons.wikimedia.org/wiki/File:Knowledge-sharing.jpg [Figure 1]

Bransford, J. D., Brown, A. L., & Cocking, R. R. (Eds.). (2000). How people learn: Brain, mind, experience, and school: Expanded edition. Washington, DC: National Academy Press.

Kundzicz, K. (Photographer). (2011). „Góry Czumażowskie” hills (gmina Czarna Białostocka, podlaskie, Poland) in Knyszyn Forest near the Ożynnik hamlet (gmina Wasików) [digital image].  Retrieved from https://commons.wikimedia.org/wiki/File:Podlaskie_-_Czarna_Bia%C5%82ostocka_-_Puszcza_Knyszy%C5%84ska_-_G%C3%B3ry_Czuma%C5%BCowskie_-_E_-_v-NW.JPG [Figure 2]

Wolpert-Gawron, H. (2016, August 11). What the heck Is inquiry-based learning? Retrieved from https://www.edutopia.org/blog/what-heck-inquiry-based-learning-heather-wolpert-gawron